Package Manager
The VRChat Package Manager (VPM) is currently the main feature of the Creator Companion. It helps you keep your VRChat SDKs and packages updated, and speeds up the creation and management of VRChat projects.
Prerequisites
When you first launch the Creator Companion, it will check that you have all the required programs, see Creator Companion Overview: Requirements.
Features
The Package Manager can help you do the following:
- Create new VRChat Unity projects
- Manage packages in existing projects
- Migrate old VRChat Projects created with our Legacy SDK
Create New VRChat Projects
- Click "Projects" to open your Project List, which will be empty when you first start using the Package Manager.
- Click "New" to open the template selection screen.
- Choose "World" or "Avatar" to create a new VRChat project which is all set up to create either an Udon-Powered world or an AV3-powered avatar. If you've created or installed your own Templates, you can choose one of those here instead.
- Once you've chosen your starting template, enter a name for your project and choose the parent folder in which it will be created. The final project path will be shown at the bottom of the screen.
- Click "Create Project" once you are happy with your project name and location.
- At this point, your project will be created. Wait for the initial import to finish. It may take a few minutes as Unity imports all the specified packages, processes the assets, and runs a few special commands the Package Manager has passed along to it.
- If successful, the app will transition to the "Manage Packages" screen for your new project, and a list of installed and available Packages.
- To learn more about creating VRChat projects, visit the VRChat's documentation for creators.
What actually happens when you click on Create?
- A directory is created at
targetDir, which is the directory you specified in the "Location" field plus your project's name. - Your selected template is copied to this directory.
- The ProjectSettings file is updated with the name of your project as the
productName. - If one of the above steps fails and the
targetDirdoes not appear to be a valid Unity project then the targetDir and its contents are deleted, and an error is shown. - Otherwise, the VRChat Package Manager adds it to the list of known VRChat projects (stored in the Settings file as a string[] called
userProjects, and transitions to the "Manage Packages" screen
Manage Packages in Existing Projects
The Package Manager makes it easy to update packages in existing projects.
- Click "Projects" in the menu to open your Project List, which will be empty when you first start using the Package Manager.
- Click "Add Existing Project" to bring up a folder selection screen. You can select a single Unity Project Folder to add that to your project list, or select a folder which contains many Unity Projects to easily add them all.
- After adding your project to the list, click the 'Manage Project' button to open its details.
- If the project has not yet been migrated to use VPM packages, you'll need to migrate it first.
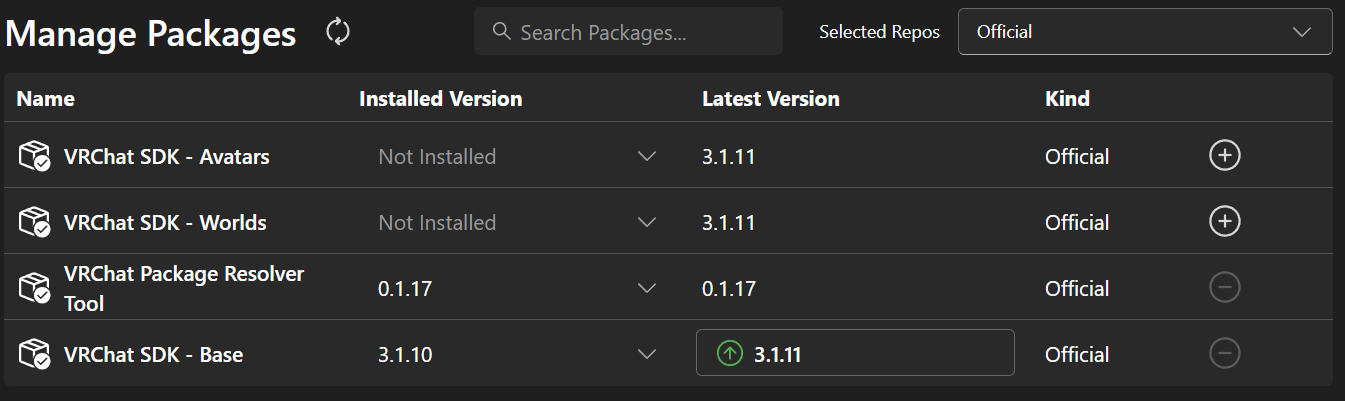
- If a package shows an "Installed Version", it is installed in your project. Packages that are not installed will show "Not Installed".
- For any package, you can select the version dropdown to see all previously released versions of that package.
- Select a version to add that package to your project, or select the "+" icon on the right to automatically install the newest version.
- If there is an update available, you can download it by clicking the "Latest Version" button.
Migrate Old VRChat Projects (Legacy SDK)
If you have existing SDK3 World or Avatar projects that use our Legacy SDK, their VRChat SDKs can be automatically migrated to this new VPM-compatible format.
- Click "Projects" in the menu to open your Project List, which will be empty when you first start using the VPM.
- Click "Add Existing Project" to bring up a folder selection screen. You can select a single Unity Project Folder to add that to your project list, or select a folder which contains many Unity Projects to easily add them all. After adding your project to the list, click the 'Manage Project' button to open its details.
- If this project is a
.unitypackage-style SDK3 Worlds or Avatars project with anAssets/VRCSDKfolder, a button will appear with the label "Migrate Project"

- If the project is not recognized as a VRChat project, the button will not appear. Try opening the project to get the Creator Companion to recognize it.
- Unsupported SDKs (SDK2) are not supported.

- If your project type is supported, click "Migrate Project" and kick back. This process can take a few minutes for a small project, and much longer for a large one. Once it's complete, you can manage your project's packages and open it via the Creator Companion.
What actually happens when you click on Migrate Project?
- A directory is created at
targetDirwith the name {ProjectName}-Migrated, with "-#" appended as needed to guarantee a unique folder name (like myproject-Migrated-1, myproject-Migrated-2, etc) - All of the files in the
originalProjectDirare copied totargetDirexcept for Library, Logs, Assets/VRCSDK, Assets/Udon, Assets/VRChat Examples, Packages/com.vrchat.vrcsdk3 and ProjectSettings/ProjectVersion.txt. - EditorSettings.asset is copied from the included "Base" template into the new project's ProjectSettings folder, to ensure the project uses AssetDatabase v2 and some other important settings.
- If the new project does not have a manifest at Packages/manifest.json, the one included in the "Base" template is copied into the new project's Packages folder.
- The manifest has the VRChat Base package added to it, as well as either the World or Avatar packages, depending on the type of project being migrated.
- If the above steps are successful, the output of the process is written to targetDir as migration-log.txt. If there is an issue, then the output of the Error log is written to the standard Logging path as {projectName}-migration-log-error.txt, and the output of the general log is written to the standard Logging path as {projectName}-migration-log.txt."